
If you know anyone in your life who does makeup, one thing they will always attest to is the importance of good brows. I can’t say enough about how much brows can completely make or break your face, and no one wants a broken face!
I, myself, have problem brows. I used to fight and fight with my brows, trying to make them have more of an arch, until one day I realized my brows look terrible with a fake, forced arch. It seems pretty obvious, but a lot of women tend to think that the more arched and the higher their brows are, the better they will look. (we’ve all seen those brows that look surprised all the time. Higher does not always equal better.) The truth is, your brows will look their absolute best when they follow theirnatural shape. The key isn’t forcing your brows into a new and unnatural shape, it’s maintaining and grooming the shape you have, even if that shape has no arch.
Take a look at all of these brows. Some are short, some are long, some are straight, some are arched, but they all look perfect with they eyes that they go with.


To help you on your journey to great brows, I’ve put together this step by step for maintaining and grooming them. Remember that everyone’s natural brow shape is different, so yours might look a little different then mine.
Here is what you will need:

1. Eyeshadow – I prefer to use eyeshadow rather then an eyebrow pencil when I fill in my brows, but you can use either one. When picking a brow color, a good rule of thumb is to stay within 2 shades of your natural color, and around 2 shades darker than your hair color. *If you’re wanting your brows lighter than they are, talk to your stylist about lightening them a few shades (good for platinum blondes with black brows)
2. Eyebrow brush – I use this to brush my brows in shape so I can see where I need to tweeze and to avoid tweezing where I shouldn’t.
3. Tweezers – When it comes to tweezers, you get what you pay for.
4. Short angle brush – You can get these brushes anywhere really. Just look for something similar to the one above.
5. Eyebrow gel – Most makeup brands make an eyebrow gel. They come in different colors or in clear. My favorite is the MAC Brow Set, but if you want something cheaper there are a few different brands available at Target.
6. Razor – this small straight razor is a great tool to have in your makeup kit.
7. Scissors – preferably eyebrow scissors so you don’t end up cutting off half your eyebrow.
This is what my brows look like before I do anything to them:

See? Problem brows.
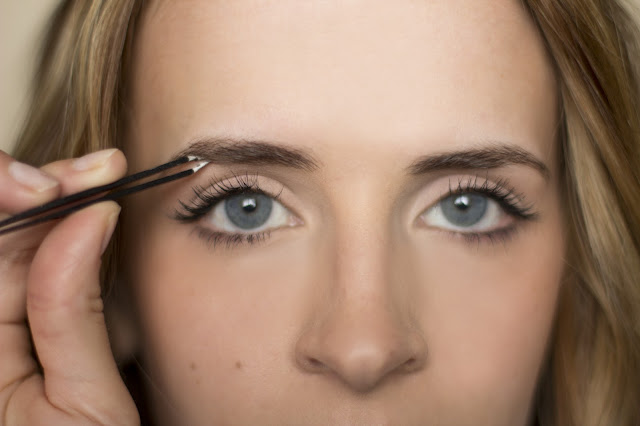
1. Use your brow brush to gently brush your brows slightly upwards and out, following the natural shape of your brow. Don’t force them too much, just guide them and let them lay where they naturally do.

2. Once your brows are brushed, tweeze any hair that isn’t in the natural brow shape. Avoid pulling and stretching your brows while you tweeze so you don’t end up over tweezing. Another good rule of thumb is to avoid getting too close to the mirror. The closer you are, the more imperfections you’ll see, and before you know it you’ve over tweezed! *If your brows are already sparse from over tweezing and they don’t ever seem to grow back in, you may want to consider using this. TIP: Tweeze your brows right after you get out of the shower. The steam will soften the hair follicle, making tweezing a lot less painful.
3. Use the razor to remove peach fuzz above your brows (I also use the razor in between my brows since waxing makes me break out). A lot of people neglect the hair above their brows. Removing extra peach fuzz can add a lot more definition to your brows, just be careful not to cut down into your actual brow.

4. Use your brow brush to gently brush your brows directly upwards. Carefully trim anything that sticks up too high. You don’t need to comb them too tightly. If you comb them up and nothing sticks out, they probably don’t need to be trimmed.

5. Using a short angle brush (or your brow pencil) fill in your brow, applying in short, light strokes. The key to making it look natural is to apply the color in the direction the hair grows, almost like you are just drawing in new hair.

6. Use your brow gel to set your brows in place. Brush your brows slightly upwards and out like you did with the brow brush.

Ta-da!


